Google Opal Tutorial: Build No-Code AI Apps in Minutes
- Xuebin Wei

- 10 hours ago
- 4 min read
If you have ever wanted to build a customized AI application but felt intimidated by the coding required, the landscape has just changed. Google Opal is a powerful new experimental tool that allows you to combine multiple AI agents to work together and build fully functional apps—without writing a single line of code.
Whether you need to generate automated course slides, draft complex documents, create images, or build custom web pages, Opal lets you orchestrate the entire workflow visually. It is a fantastic addition to your AI teaching toolkit, right alongside using Gemini Gems to build your own AI Teaching Assistant. In this tutorial, we are going to dive deep into exactly how to build with Google Opal, starting with a simple weather app and moving to a complex, multi-agent slide generator.
What Makes Google Opal Different?
Unlike standard AI chatbots, which use back-and-forth conversation, Google Opal functions as a visual app builder. You define a workflow. You start with user input, connect it to specific AI models (like Gemini 3 Flash for text or Nano Banana Pro for images), provide tools (like web search), and define the final output format.

This structured approach makes it incredibly easy to automate repetitive tasks. And once you have your final output—such as a text document or a dataset—you can easily plug it into other tools, much like we used the NotebookLM 2026 Update to turn documents into a knowledge database.
Google Opal Tutorial Project 1: Building a Simple Weather App
To understand the basics of Opal, let's build a very simple application that gathers user input and generates a web page.
Step 1: Gathering User Input
Every app starts with data. In the Opal editing environment, we begin by dragging an "Input" block onto the canvas. For this app, we configure it to ask the user for one specific piece of information: their location or zip code.
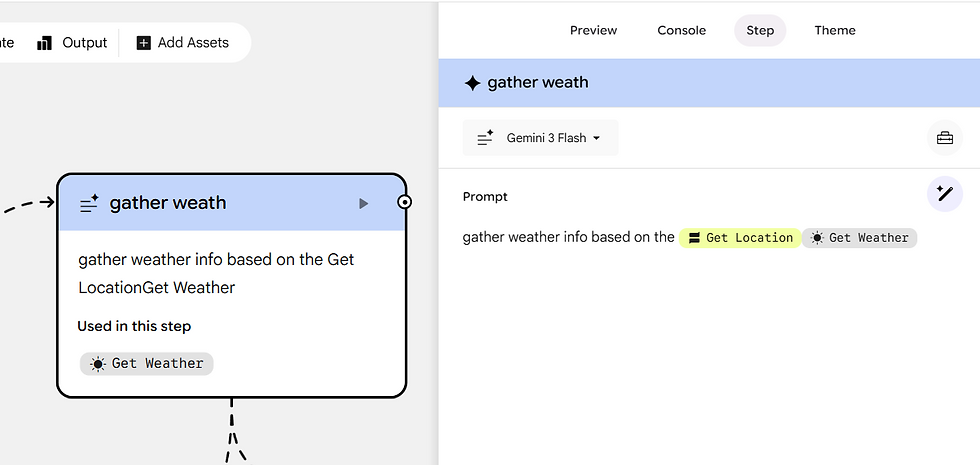
Step 2: The First Generate Step (Gathering Data)
Next, we add a "Generate" step and connect our input to it. For this step:
Select the Model: We use Gemini 3 Flash, which is optimized for fast text generation.
Provide the Tool: We equip this step with the "Get Weather" function from Opal’s toolbox.
Set the Prompt: We instruct the AI to gather the current weather information based on the user's location.
Step 3: The Second Generation Step (Creating Visuals)
We don't just want text; we want a modern interface. We pass the gathered weather data to a second Generate step. This time, we select the Nano Banana Pro model and instruct it to "create an image reflecting the current weather conditions at the provided location."
Step 4: Formatting the Output
Finally, we add an "Output" block. Opal allows you to save outputs as Google Docs, Google Sheets, or Google Slides. For this app, we chose the "Web Page" format. We prompt the output to display the weather text alongside the generated image. Once published, anyone with the link can enter a zip code and instantly get a custom, AI-generated weather dashboard!

Project 2: Orchestrating a Complex Multi-Agent Slide Generator
Now that we understand the basics, let's build something much more advanced. When teaching AI or data analytics, creating course materials takes time. We can use Opal's "Agent" mode to completely automate this process.
In this workflow, the user simply inputs a data science topic (e.g., "Graph Databases"). Here is how the Opal workflow handles the rest:
Agent 1 (Research & Outline): We set an agent to search the web for the latest information on the provided topic. It synthesizes this research and creates a structured 5- to 8-page slide outline.
Agent 2 (Image Prompt Generation): The outline is passed to a second agent, which reads the text and generates specific, optimized image-generation prompts for the slide visuals.
Agent 3 (Image Creation): Using Nano Banana Pro in agent mode, the app generates multiple educational images simultaneously based on those prompts.
Agent 4 (Slide Assembly): The final agent takes the outline and the generated images, formats them professionally, and exports them directly into a ready-to-use Google Slides presentation stored in your Google Drive.

Once Opal generates these presentation files, you can easily take them to the next level. For instance, you can use Google Vids to turn these slides into AI-generated teaching videos, creating a complete, narrated lecture package for your students.
The Power of Agent Error Handling
One of the most impressive features of Opal is how the "Agent" model handles errors. During our test build, the agent encountered a web search error. Instead of breaking the app or requiring human intervention, the agent autonomously read the error, devised an alternative search approach, and successfully generated the outline.

Share and Publish Your No-Code App
Once you are happy with your app, Opal makes it incredibly simple to share it. By clicking the "Share" button, you have full control over the app's permissions. You can:
Keep it private (only you).
Customize permissions to share it with specific people (perfect for sharing with your students or teaching assistants).
Publish the app so that anyone with the link can use your custom AI workflow.
Building AI applications used to require a team of developers and complex backend infrastructure. Today, your imagination is truly the only limitation. Dive into Google Opal and start building your first agent workflow!


Comments